Thursday, July 14, 2011

Fourth Post-Tutorial 4 < Retouching & Enhancing >

Step 1--> Choose Auto Color
Step 2---> Shadow Higlights
Go to image there and select Shadow highlight.
For shadow amount choose 19% and for highlight amount choose 70%.

Step 3--> Hue/ Saturation
Go to adjustment double click and choose hue/ saturation.
For the saturation choose+50

Step 4--> Level
Go to adjustment and choose level.

Step 5--> Clone stamp
Use clone stamp to make more effect on it

Step 6--> Color balance
Go to adjustment and choose color balance. Choose the color balance
until you satisfied.

Step 7--> Clone stamp
Use clone stamp to repair the shortcoming of the bridge.

Step 8--> Clone stamp
Choose the maple size to do the effect.

Step 9--> Lens Correction
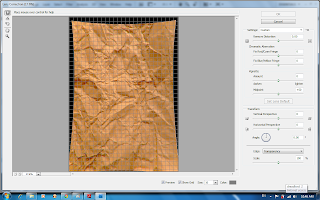
Choose Filter >Distort > Lens Correction. Adjust the lens until
you satisfied.

Final result~~~
I'm not satisfied with it, I think i will redo it~

Sunday, July 3, 2011

Third Post-Tutorial 3< Layer Basics>

Doing the improvement with using layer basic from the second post of Selection tools~

Step 1 --> Change the background slightly bright
Go to Layer then click adjustment. Choose Brightness and
adjust to the level of the brightness that you want.

Step 2--> Decorate the title
Go to Layer then click Rasterize. After that press layer
then use selection tool to select the word of "M".
Use Gradient tool to decorate the word of "M".

Step 3--> Rasterize
This is to show the step of Rasterize the layer.
Then repeat step 2 again.

Step 4--> FOM bridge
As usual rasterize the layer then use selection tool to select the picture.
Then go to Filter choose Artistic. After that, click the sponge to get the effect.

Step 5--> Effect on Black people 1
Repeat step 2 and use the gradient tool to get the effect.

Go to Filter and choose texture.
Then adjust the level of patchwork to get the satisfy effect.
Go to Filter then choose sketch. Then use notepad
and adjust the level of notepad to get the effect.

Step 6--> Decorate FOM word
Repeat the step 2 then use gradient tool to decorate.
Adjust the level of colour and the pattern of gradient to get the effect.

Step 7--> Final Result ^^
Put on the image of open day and the date. Then the image is done~ ^^

Hope u all enjoy and love my work ^^
Finally done~


Saturday, June 25, 2011

Second Post- The making of EWALLPAPER

Below these are the 5 original pic that i use to design my wall paper~


Step 1--> Choose A4 as the size of the eWallpaper


Press File, then click new~
After that, choose international paper, then click A4~

Step 2--> Move the pic to A4 there as the background of eWallpaper
Open the image as smart object, then press arranged document.
Then use move tool to move the image to A4 background there.
After that, use free transform to resize it.

Step 3--> Resize banner
Repeat the step 2 but open the banner image as smart object.

Step 4--> Font
Use the font tool type the word "MMU".
Then use free transform to resize the word.

Step 5 --> MMU Logo
Use magic wand tool to crop the mmu logo.
Then, use free transform to make it bigger~

Step 6 --> FOM picture
Repeat step 2 by using FOM image as smart object.

Step 7--> Font and Black People Image
Repeat step 2 for the black people image and repeat step 4.

Step 8--> OPEN DAY image
Repeat step 2 a for the open day image.

Step 9--> Final Result
For the last, using font to write down the date
and use free transform to make it bigger.
DADADA~~ The eWallpaper is finish ady~
Looks it nice and easy by using photoshop~~


Friday, June 24, 2011

First post of this blog- INTRODUCTION


Hi, Madam Lydia~
I'm Lynn, from Port Dickson
I'm currently taking Digital Media this sem which under BC271B
I'm majoring in Finance but actually I wish to take IT at first~
haha~
Hope you will enjoy my work which I'm going to update in this sem~